Showing posts with label Do-It-Yourself Projects. Show all posts

Wednesday, December 21, 2011

Wedding Invitation Keepsake

How gorgeous is this wedding keepsake?!!! What a wonderful way to commemorate a wedding by encapsulating the invitation in a Christmas bauble to hang on the tree every year. Just imagine the delight of rediscovering this sentimental piece amongst your Christmas decorations each year.... soooo sweet.


The best part is that you can easily make it yourself. Christy of From Glitter to Gumdrops blog shared the idea with easy how-to-steps. It's as simple as cutting the invitation into equal strips (ensuring that you keep visable the key information, names, date etc), wrapping them around a pencil to create lovely curls and then inserting them into a glass ornament. And voila... a beautiful ornament to honor a beautiful day.


Monday, September 5, 2011

Gelato Bar

If i had to make a list of my favourite things in life, one of them would definitely be ice-cream. I guess that comes as no surprise as i've written before about having a vintage ice-cream van arrive at your wedding or setting up a vintage ice-cream stall and serving ice cream cones.


It's all about the experience of having interactive food and dessert bars... they are a very popular feature at weddings these days. So when last month i attend an event for The Wedding Collective in Brisbane, i almost melted when i saw the superb gelato ice bar they had... Bravo! ... I am adding this to my 'dream wedding' scrapbook. Serving gelato out of an ice sculpted bar is so perfect for a Queensland wedding.

Above: Gelati Bar by Wine & Dine'm in Brisbane


Another fabulous ice sculpture ice-cream bar (J Grace Photograph)

If an extravagent ice bar doen't fit into your budget, why not place ice cream tubs in decorative bowls filled with crushed ice. It's like Caviar for kids !! Or you could even serve your ice cream in individual ice bowls. For that extra special touch, freeze rose petals into the bowls.


How cute is this !!! Individual ice-creams in mini mason glasses! Simply fill a display bowl with crushed ice, and rest the ice cream (or gelato) filled mason glasses around it. Super sweet !!

Friday, February 18, 2011

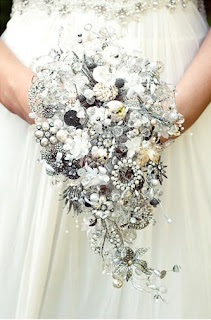
Vintage Brooch Bouquet

Gemstone bouquets are catching the eye of modern brides. Rather then splurging on a bouquet of flowers that last only a few days, brides are opting for a new-age bouquet version of a cluster of gemstone and brooches. Whether you buy an already made one or design and create a bouquet yourself, it's certainly going to be a wedding keep-sake.


Wednesday, October 6, 2010

Pom Pom Decorations

While i was in Paris a few weeks ago, I saw this beautifully creative window display in a boutique. It's a stunning new take on the 'hanging pom poms' which have taken over the world... and dessert tables. I think they look gorgeous, like massive roses! I have no idea how to make them, but i know that all the creative event designers out there will master them in a minute. Please enjoy !!


Sunday, September 26, 2010

Cupcake In A Jar

The cupcake phenomenon just won't end. Now this sweet treat has been reinvented in a novel way... a cupcake in a jar! Perfect for cute take-home wedding favors.


Here is the DIY recipe as posted by My Cakies:

Ingredients:
- 2 1/2 cups all-purpose flour
- 1 1/2 cups sugar
- 1 tsp baking soda
- 1 tsp salt
- *2 1/4 tsp cocoa powder
- *1 1/2 cup canola oil
- 1 cup buttermilk, room temperature
- 2 large eggs, room temperature
- 2 tbsp red food coloring
- 1 tsp white distilled vinegar
- *2 tsp vanilla extract

for the cream cheese frosting:
- 1 pound cream cheese, softened
- 2 sticks butter, softened
- *2 tsps vanilla extract
- 4 cups sifted powdered sugar

Step 1: Prepare batter and fill each cupcake pan 2/3 full. Bake in a moderate oven for approximately 17 minutes.Take out of oven and allow to cool on a wire rack.
Step 2: Once cooled, cut each cupcake in half. Place the bottom half in the bottom of each jar.
Step 3: Put a layer of frosting.
Step 4: Take the top of the cupcake and place it onto of the frosting. Flatten the top part of the cupcake inside the jar to make it flat (ish).
Step 5: Beautifully frost the top of the cupcake.
Step 6: Cover with lids and package to your individual style.